Kubernetes the not so hard way with Ansible - Persistent storage - Part 2 - (K8s v1.28)
Introduction
When it comes to stateful workload in Kubernetes you have quite some CSI driver options nowadays which are listed in the CSI driver list. Quite a few are only interesting if your Kubernetes cluster runs in the Cloud like Google, AWS or Azure. Or if you have some EMC, Netapp or similar hardware. For my little self-hosted K8s cluster that’s not an option of course.
This blog post uses the infrastructure I’ve setup in my previous blog posts of the Kubernetes the not so hard way with Ansible series.
My requirements
My requirements for storage are basically like this:
- Must: Works with Linux
- Must: Provides block storage
- Must: Small memory footprint
- Must: Opensource (and I mean really open source, not those pseudo open source products with strange licenses)
- Must: Chances are high that it’s here to stay 😉
- Must: Able to use local disks on Kubernetes worker nodes
- Must: Data availability (e.g. via replication)
- Should: Build for K8s but other storage options are ok as long as a CSI driver is available
- Should: Easy to install, manage and upgrade
- Should: Written in Python or Go (because I know that languages)
- Should: If possible, use what Linux already provides if it comes to storage tools
- Optional: Encryption out of the box
- Optional: S3 compatible object storage
- Optional: NFS support
Available products
So with this lets see what’s in the CSI driver list and which products come at least close to the requirements:
- Ceph (CSI) and rook: While Ceph would be the a really great option if it comes to features, that thing is just a monster 😉 If you REALLY take the requirements seriously you need quite some hosts to get a reliable storage cluster. Not for “normal” people like me 😁
- CubeFS: Too new. Future unknown. But looks already dead. No commit since 9 month as of January 2024
- GlusterFS: Around for many years (long before K8s was invented 😉). I’ve worked with it years ago. In general worked fine so far at that time. But it uses FUSE (filesystem in userspace). So performance wise maybe not the best option. Maintained by Redhat. Not only for K8s.
- JuiceFS and JuiceFS driver: Also around for some years meanwhile. Not only useable for K8s. What I don’t like is that you needed something like Redis to store metadata. That’s an additional component that needs to be maintained.
- Piraeus Datastore: That one is basically backed by LINSTOR and DRBD. I’ve used DRBD for HA PostgreSQL clusters many years ago. It’s also part of the Linux kernel. At that time DRBD was rock solid. That one is one of the newer options in K8s space. When I was having a look a while ago a lot of stuff was written in Java. The memory requirement very high. Meanwhile it looks like they’ve rewritten most of the stuff in Go. Might be worth a second look.
- MooseFS and MooseFS CSI: This is more a replacement for NFS. MooseFS spreads data over a number of commodity servers, which are visible to the user as one resource. For standard file operations MooseFS acts like ordinary Unix-like file system. So no block storage.
- NFS CSI: Not really useful for block storage.
- OpenEBS: Pretty interesting option. Tried it out a few years ago and worked pretty well. But with all that different options you have it’s a little bit confusing. I also have the feeling that development slowed down since around mid 2022. But might also be worth another try.
- seeweedfs: Fast distributed storage system for blobs, objects, files, and data lake, for billions of files. But not for block storage. But might be a really good option for Object Storage (S3 API compatible).
- SMB CSI Driver: You know… For mounting Windows CIFS/SMB shares 😉
- iscsi: Kubernetes in-tree
iscsidriver. If you have aniscsiserver around that might be a valid option for block storage. Not very “cloud native” 😉 A few quick tests a while ago worked quite well. Might be an option if you already have a storage appliance with iSCSI support. - TopoLVM: TopoLVM is a CSI plugin using LVM for Kubernetes. It can be considered as a specific implementation of local persistent volumes using CSI and LVM. So depends on single nodes. If that node goes away you’re data is gone too. Only for very specific use cases IMHO.
- Longhorn: I kept this one for the end of this list as this is the one I’ve chosen to use 😉 It provides most of the requirements I mentioned above. Also it’s a CNCF Incubating Project which increases changes that it will survive at least a few years. Development is also very active. Originally developed by Ranger Labs which was bought by SUSE in 2020. It’s components (controllers) are mainly written in Go.
As of writing this blog post Longhorn v1.5.3 was the latest release. This one supports Kubernetes 1.25 and upwards. My current K8s version is v1.28.
Soft- and hardware requirements
To you use Longhorn you should have at least the following hardware and software available:
- 3 Kubernetes (worker) nodes
- 4 vCPUs per node
- 4 GiB HDD space per node (SDD/NVMe for applications that need speed or spinning disk for archival stuff e.g.)
- Officially supported Linux distributions are: Ubuntu 22.04 (the one I use) and also SUSE SLES 15 SP4, RHEL/Oracle Linux 9.1 and Rocky Linux 9.2 (but I guess somehow recent Linux distributions will also work just fine - they’re just not officially supported)
- Linux Kernel
>= 5.8is recommended as there is filesystem optimization/improvement since this version. See this issue for details. - Kubernetes
>= v1.25and<= v1.28(for Longhornv1.5.x) open-scsiinstalled andiscsiddaemon running on all nodes. For RWX support a NFSv4 client is needed too. Alsobash,curl,findmnt,grep,awk,blkidandlsblkbinaries must be installed.jqandmktempare needed for the environment check. This tasks (besides others) are handled by my Ansible Longhorn roleext4andxfsfilesystems are supported- It also makes a lot of sense to have a dedicated disk for Longhorn for every node instead of using the root disk e.g.
- Since Longhorn doesn’t currently support sharding between the different disks it’s recommended to use LVM to aggregate all the disks for Longhorn into a single partition, so it can be easily extended in the future. I’ll use my Ansible LVM role to setup LVM accordingly.
So in my case I’ve four Kubernetes worker nodes but I only want to use three of them storing data via Longhorn. That’s because three of them have a SSD block device available at /dev/vdb and the fourth node don’t have such a disk. But it’s no problem with Longhorn to have the data stored on a specific set of nodes while the workload runs on other nodes (see: Tip: Set Longhorn To Only Use Storage On A Specific Set Of Nodes). But in my case the workload should run on the nodes that also store the data. We’ll get back to this later. In my case every VM has a dedicated block device at /dev/vdb which will be only used for Longhorn storage (or as a logical volume (LVM) which in turn will be used by Longhorn). So thelsblk output of the three nodes with the /dev/vdb disk looks like this:
NAME    MAJ:MIN RM   SIZE RO TYPE MOUNTPOINTS
vda     253:0    0   100G  0 disk
├─vda1  253:1    0  99.9G  0 part /
├─vda14 253:14   0     4M  0 part
└─vda15 253:15   0   106M  0 part /boot/efi
vdb     253:16   0     1T  0 disk
Install LVM
As mentioned above Longhorn currently doesn’t support sharding data between different disks on one node. So I’ll use Linux “Logical Volume Manager” (LVM) to be able to add more disks later if needed. In order to be able to install everything LVM related on the selected nodes I’ll first create a new Ansible group in my Ansible’s hosts file. E.g. (you need to insert the correct hostnames of course):
k8s_longhorn_lvm:
  hosts:
    k8s-01[01:03]03.i.example.com:
The hosts group is called k8s_longhorn_lvm and contains the hosts k8s-010103, k8s-010203 and k8s-010303 (as mentioned above I’ve four worker nodes but the fourth one should not run Longhorn). Next I’ll install my Ansible LVM role from Ansible Galaxy:
ansible-galaxy install githubixx.lvmThe configuration for this role looks like this. You can put it in group_vars/k8s_worker.yml or wherever it fits best for you:
lvm_vgs:
  - vgname: vg01
    pvs: /dev/vdb
    state: present
    lvm_lvs:
      - lvname: lv01
        size: 100%VG
        state: present
        fs:
          type: ext4
          opts: -m 1 -L var_lib_longhorn
          state: present
          mountpoint:
            opts: noatime
            state: mounted
            src: LABEL=var_lib_longhorn
            path:
              name: /var/lib/longhorn
              mode: '0750'
              owner: root
              group: root
For all possible options please have a look at the README of my Ansible LVM role. But in short what this configuration is all about:
- There is a “root” object
lvm_vgs. - Below that the volume groups are defined. In this case a volume group
vg01will be created and it will be backed by block device/dev/vdb(as mentioned above). - Next below the element
lvm_lvsthe logical volumes are defined. I’ll only install one logical volume calledlv01. It will100%of the size of the volume groupvg01. - The logical volume
lv01will be used to install anext4filesystem on it. It will reserve 1% of the file system blocks for the super-user. The volume label of the file system will bevar_lib_longhorn(because the mountpoint will be/var/lib/longhorn). Which brings us to the final part… - The mountpoint for the file system will be
/var/lib/longhorn(as already mentioned). Instead of a device path the volume labelvar_lib_longhornwill be used as the source for the mountpoint. The filesystem wont handle access times (noatime) which gives a little bit more performance. The mount will be owned by userrootand grouproot. The user has read+write access while the group only has read access (0750).
As already mentioned in the previous articles of this blog post series my playbook is called k8s.yml. This needs to be extended so that the roles will be installed where needed e.g.:
  hosts: k8s_longhorn_lvm
  roles:
    -
      role: githubixx.lvm
      tags: role-lvm
With this configuration the volume group, logical volume, filesystem and mountpoint can be installed:
ansible-playbook --tags=role-lvm --limit=k8s_longhorn_lvm k8s.ymlIf that is done you should see a new mountpoint on the hosts in question e.g.:
ansible -m shell -a 'df -h | grep mapper' k8s_longhorn_lvm

k8s-010303.i.example.com | CHANGED | rc=0 >>
/dev/mapper/vg01-lv01 1007G   28K  997G   1% /var/lib/longhorn
k8s-010103.i.example.com | CHANGED | rc=0 >>
/dev/mapper/vg01-lv01 1007G   28K  997G   1% /var/lib/longhorn
k8s-010203.i.example.com | CHANGED | rc=0 >>
/dev/mapper/vg01-lv01 1007G   28K  997G   1% /var/lib/longhorn
Preparing Ansible Longhorn role
With the disk and filesystem for Longhorn in place lets setup Longhorn role for Kubernetes. First I add a new role and tag to the k8s_longhorn_lvm group in my playbook file (k8s.yml) e.g.:
  hosts: k8s_longhorn_lvm
  environment:
    KUBECONFIG: "/opt/scripts/ansible/k8s-01_vms/kubeconfig/admin.kubeconfig"
  roles:
    -
      role: githubixx.lvm
      tags: role-lvm
    -
      role: githubixx.longhorn_kubernetes
      tags: role-longhorn-kubernetes
The role requires a valid KUBECONFIG file. If it’s in default location $HOME/.kube/config you don’t need to set the environment variable KUBECONFIG as in the previous example.
The Longhorn role has two places where you can find various settings that can be changed. The first one is the usual defaults/main.yml.
Most of the settings there I just keep as is. For a few others I have chosen different values and added them to group_vars/all.yml (or wherever it fits best for you of course) e.g.:
longhorn_nodes_user: "k8s_longhorn_lvm"
longhorn_nodes_system: "k8s_longhorn_lvm"

longhorn_label_nodes: true
longhorn_node_selector_user:
  "longhorn.user.components": "yes"
longhorn_node_selector_system:
  "longhorn.system.components": "yes"

longhorn_multipathd_blacklist_directory: "/etc/multipath/conf.d"
longhorn_multipathd_blacklist_directory_perm: "0755"
longhorn_multipathd_blacklist_file: "10-longhorn.conf"
longhorn_multipathd_blacklist_file_perm: "0644"
As mentioned above already I want the Longhorn components only on a specific set of Kubernetes worker nodes. longhorn_nodes_user specifies the Ansible group name of the nodes where the Longhorn “user components” should run. longhorn_nodes_system does the same for the Longhorn “system components”. In my case both kinds of Longhorn components will run on the same nodes where I installed LVM. So both will have the same value and that’s the Ansible host group k8s_longhorn_lvm.
One possibility to let Kubernetes know on which nodes the workload (Longhorn in my case) should be scheduled are node labels. You can either put node labels on your own (e.g. by using kubectl) or use this role. For this longhorn_label_nodes needs to be set to true. With longhorn_node_selector_user you can specify one key/value or a list of keys/values. So the role will install this/these label(s) on the node group specified in longhorn_nodes_user. When Longhorn will be deployed Kubernetes schedules all Longhorn user components on the nodes that have this/these label(s). In my case the label key is longhorn.user.components. The same is true for the system components. They’ll be scheduled on the nodes with the label key longhorn.system.components. Note: Please keep in mind that the “user” components can only be scheduled on nodes that also have the “system” components. The “system” components can run without the “user” components on different nodes.
The Longhorn documentation has also a page about Node selector. It also contains important information if you really want to change node selectors on Kubernetes cluster where Longhorn is already in use. E.g. you want to make sure that all Longhorn volumes are detached during such a change…
For other possibilities to run Longhorn on a specific set of nodes read Tip: Set Longhorn To Only Use Storage On A Specific Set Of Nodes. It describes further interesting ways to achieve the same goal.
For more details please also have a look at the comments in defaults/main.yml and the README of the Ansible Longhorn role.
The longhorn_multipathd_blacklist_* variables enable multipathd blacklist. For more information see Troubleshooting: MountVolume.SetUp failed for volume due to multipathd on the node. In short: These settings prevent the multipath daemon from adding additional block devices created by Longhorn. So this is basically trying to avoid that two processes “handle” the same resource differently. The blacklist is defined in 10-longhorn.conf. By default that are devices which names have this pattern: ^sd[a-z0-9]+.
Before Longhorn can be deployed a few more settings needs to be checked. These are the values that will be used by the Helm chart later when Longhorn gets installed. By default longhorn_values_default.yml.j2 in the templates directory is used. You can also use this file as a template and create a file called longhorn_values_user.yml.j2 in the templates directory where you can specify your own settings. All possible settings can be found in Longhorn’s values.yaml file.
longhorn_values_default.yml.j2 is well documented. So I won’t repeat the settings here. In general the values of these settings were chosen for a production environment but it partly depends on the size of the Kubernetes cluster and other factors if the settings make sense or not. So review the settings carefully and adjust for you Kubernetes cluster accordingly!
One word of caution: The settings in defaultSettings in longhorn_values_default.yml.j2 file are really only used during the very first setup of Longhorn. So if you change them later they won’t be deployed! It has no impact on existing Longhorn deployments. Changing settings for a running Longhorn deployment should only be done in Settings tab via the Longhorn UI. The main reason for that is that some changes can have catastrophic consequences if set incorrectly. The Longhorn UI does some sanity checks before it makes the changes persistent. As we deal with (distributed) data here you really want to make sure that you’re aware of the consequences! So you should really try to have the correct settings right from the start. Maybe try on a test system first and play around what works best for you.
Next make sure that you’ve the helm binary installed on the Ansible Controller node (that the one which will run the playbook). The helm binary is executed to deploy the Longhorn resources. Either use your OS package manager or use a Ansible role like gantsign.helm e.g.:
ansible-galaxy install gantsign.helmAnd of course you also want to make sure that the Ansible Controller node has a valid kubeconfig to be able to make calls to the Kubernetes API server 😉
Install Ansible Longhorn role
To install the Longhorn role I use Ansible Galaxy again. E.g.:
ansible-galaxy install githubixx.longhorn_kubernetesAfter having all role settings in place one can check if the Kubernetes resources are rendered as expected. By default the role installs nothing. I just renders all the YAML files that will be submitted to Kubernetes for creation. So to have a look what gets rendered run this command:
ansible-playbook --tags=role-longhorn-kubernetes --extra-vars longhorn_template_output_directory="/tmp/longhorn" k8s.ymlThis will create a file called /tmp/longhorn/template.yml on the Ansible Controller node. You can review it with any text editor. If everything is fine one can finally deploy Longhorn.
ansible-playbook --tags=role-longhorn-kubernetes --extra-vars longhorn_action=install k8s.ymlFigure out if Longhorn was installed correctly
Depending on the internet connection of your hosts the deployment can take a while as it needs to download quite a few containers now. After a successful deployment you should see something like this (depends on the number of hosts you installed Longhorn on of course) if you execute kubectl -n longhorn-system get pods -o wide (if you used a different namespace - what you should not do btw. - you need to change that one):
kubectl -n longhorn-system get pods -o wide

NAME                                                READY   STATUS    RESTARTS      AGE    IP           NODE         NOMINATED NODE   READINESS GATES
csi-attacher-8575f775b4-8tfnr                       1/1     Running   0             75s    10.0.2.180   k8s-010203   <none>           <none>
csi-attacher-8575f775b4-9hvmk                       1/1     Running   0             75s    10.0.5.160   k8s-010303   <none>           <none>
csi-attacher-8575f775b4-qwqrb                       1/1     Running   0             75s    10.0.0.14    k8s-010103   <none>           <none>
csi-provisioner-b99db46c9-gk6g9                     1/1     Running   0             75s    10.0.0.147   k8s-010103   <none>           <none>
csi-provisioner-b99db46c9-jvrjf                     1/1     Running   0             75s    10.0.2.48    k8s-010203   <none>           <none>
csi-provisioner-b99db46c9-mwrhj                     1/1     Running   0             75s    10.0.5.147   k8s-010303   <none>           <none>
csi-resizer-64bb8dbb9c-2h46f                        1/1     Running   0             75s    10.0.5.254   k8s-010303   <none>           <none>
csi-resizer-64bb8dbb9c-j2758                        1/1     Running   0             75s    10.0.2.238   k8s-010203   <none>           <none>
csi-resizer-64bb8dbb9c-ztxsx                        1/1     Running   0             75s    10.0.0.82    k8s-010103   <none>           <none>
csi-snapshotter-6b7bbb4589-bhtdt                    1/1     Running   0             75s    10.0.0.211   k8s-010103   <none>           <none>
csi-snapshotter-6b7bbb4589-fd8x7                    1/1     Running   0             75s    10.0.5.39    k8s-010303   <none>           <none>
csi-snapshotter-6b7bbb4589-jfmwz                    1/1     Running   0             75s    10.0.2.39    k8s-010203   <none>           <none>
engine-image-ei-68f17757-5ccg7                      1/1     Running   0             94s    10.0.2.218   k8s-010203   <none>           <none>
engine-image-ei-68f17757-cjvgf                      1/1     Running   0             94s    10.0.0.94    k8s-010103   <none>           <none>
engine-image-ei-68f17757-xlnh6                      1/1     Running   0             94s    10.0.5.156   k8s-010303   <none>           <none>
instance-manager-1da42b009dde2b7929519252c9d11c49   1/1     Running   0             88s    10.0.0.214   k8s-010103   <none>           <none>
instance-manager-a140ee664e9bac43a3f0c4b4f703bf3b   1/1     Running   0             89s    10.0.2.231   k8s-010203   <none>           <none>
instance-manager-abb72dda61e2bf0557cb82a885359712   1/1     Running   0             94s    10.0.5.237   k8s-010303   <none>           <none>
longhorn-csi-plugin-64wjg                           3/3     Running   0             74s    10.0.5.253   k8s-010303   <none>           <none>
longhorn-csi-plugin-kr7sg                           3/3     Running   0             74s    10.0.2.245   k8s-010203   <none>           <none>
longhorn-csi-plugin-smvwp                           3/3     Running   0             74s    10.0.0.133   k8s-010103   <none>           <none>
longhorn-driver-deployer-69ddd454b4-lb92z           1/1     Running   0             117s   10.0.2.66    k8s-010203   <none>           <none>
longhorn-manager-7fn2b                              1/1     Running   0             117s   10.0.5.69    k8s-010303   <none>           <none>
longhorn-manager-jflhp                              1/1     Running   0             117s   10.0.0.112   k8s-010103   <none>           <none>
longhorn-manager-mn8lg                              1/1     Running   0             117s   10.0.2.106   k8s-010203   <none>           <none>
longhorn-ui-6766746869-6787z                        1/1     Running   0             117s   10.0.2.236   k8s-010203   <none>           <none>
longhorn-ui-6766746869-6gs4s                        1/1     Running   0             117s   10.0.0.206   k8s-010103   <none>           <none>
You might see some restarts of Pods but normally that’s okay if initialization takes a while for all components.
While upgrading Longhorn (e.g. from 1.5.2 to 1.5.3 or 1.6.0 and so on) still happens with this role you shouldn’t change any helm values anymore. Also be VERY careful and think twice before adjusting the node labels that are relevant for Longhorn! This can have pretty bad consequences for your data!
The Longhorn UI
So if you want to change settings this should be only done via the Longhorn UI. To access the UI you can use the following command (this forwards local network requests on port 8000 to a service called longhorn-frontend (the Longhorn UI) on port 80):
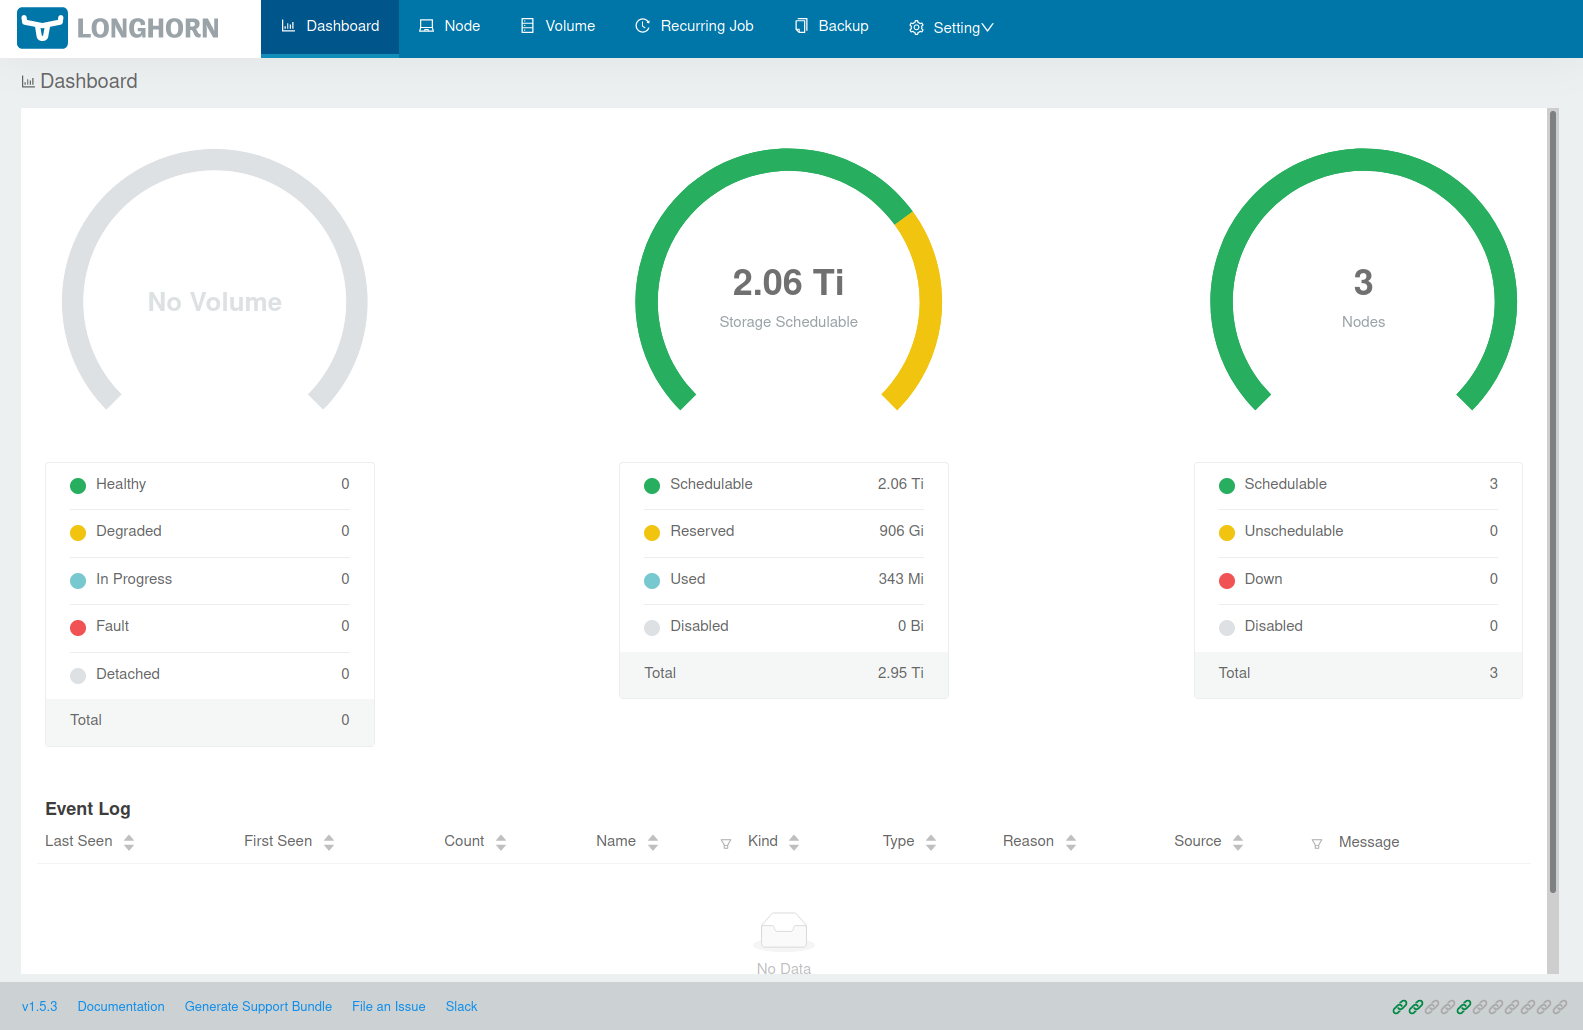
kubectl -n longhorn-system port-forward service/longhorn-frontend 8000:80If you now enter http://localhost:8000/ in our browser you’ll see the Longhorn frontend. And for Longhorn v1.5.3 it looks like this:
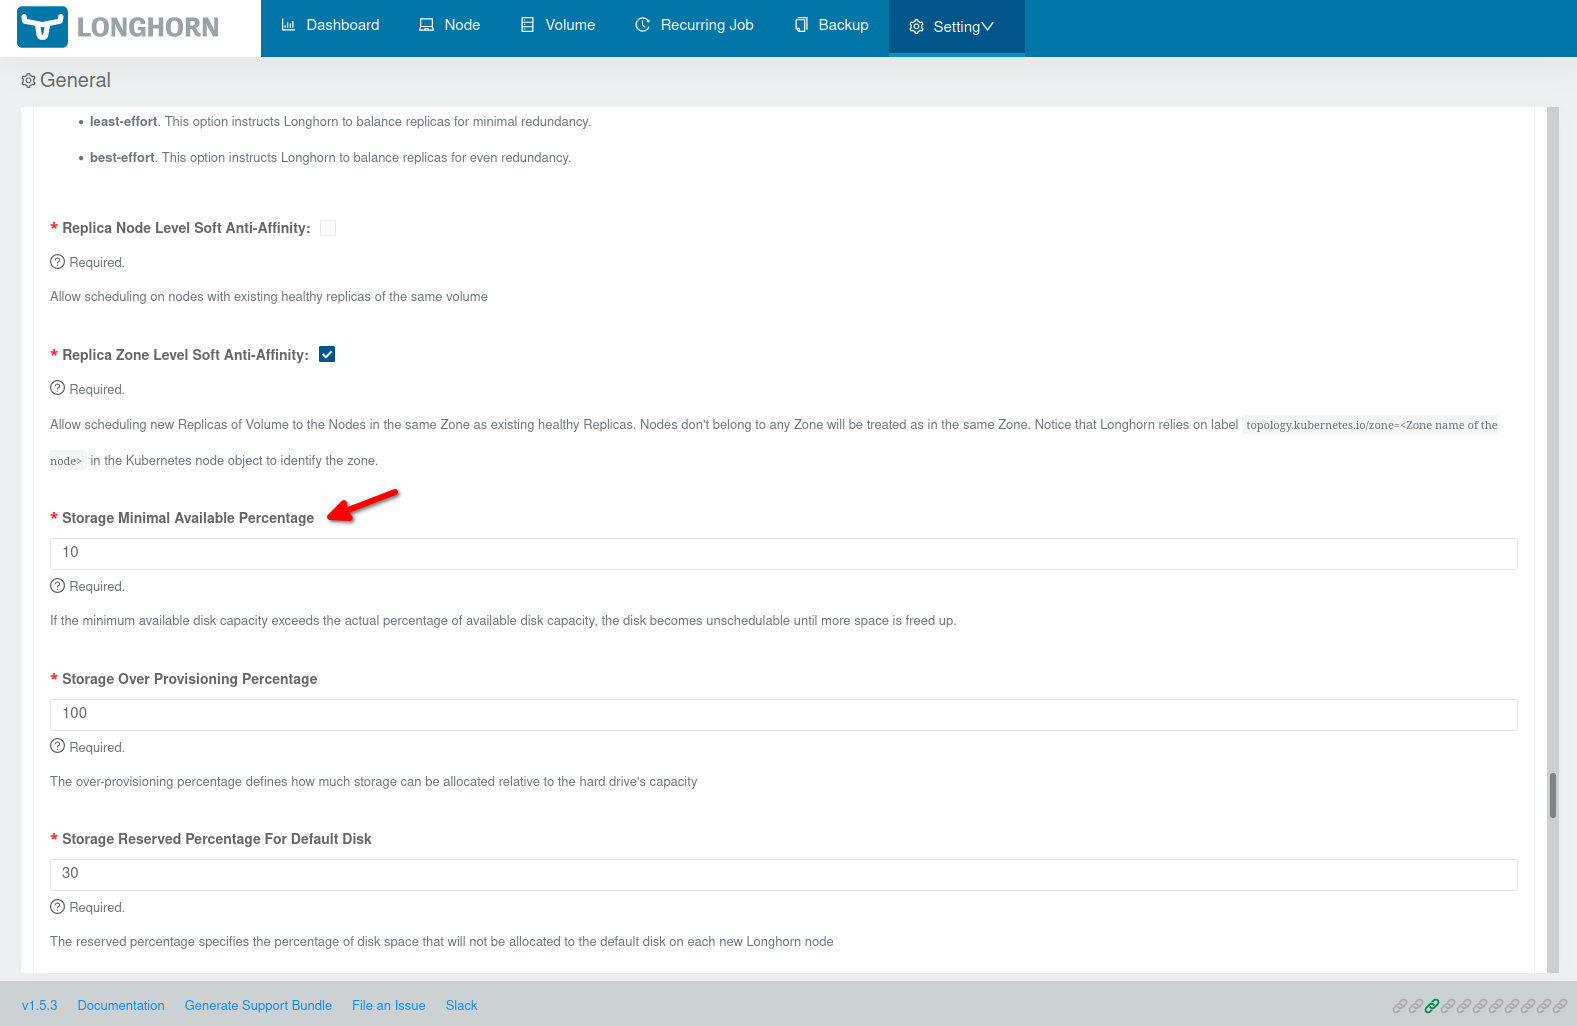
Before you continue first make sure that all the Helm chart settings (esp. the defaultSettings) you specified are picked up. Open http://localhost:8000/#/setting to get to the Longhorn settings overview. E.g. by default storageMinimalAvailablePercentage: "10" is set in templates/longhorn_values_default.yml.j2. This setting should of course also appear in the settings overview:
Some settings are a little “picky” if it comes to the values. E.g. systemManagedComponentsNodeSelector in defaultSettings doesn’t like spaces! So if you enter key: value it causes that NONE of your Helm chart values are used! But if you use key:value it works… (that caused me a few sleepless hours 😉) So again make sure set your settings are really used before start using Longhorn.
Longhorn StorageClasses
If you run kubectl get storageclasses you’ll see that you now have a default StorageClass that was also installed:
NAME                 PROVISIONER          RECLAIMPOLICY   VOLUMEBINDINGMODE   ALLOWVOLUMEEXPANSION   AGE
longhorn (default)   driver.longhorn.io   Delete          Immediate           true                   4d23h
To get more information about that StorageClass you can use kubectl describe storageclass longhorn:
Name:            longhorn
IsDefaultClass:  Yes
Annotations:     longhorn.io/last-applied-configmap=kind: StorageClass
apiVersion: storage.k8s.io/v1
metadata:
  name: longhorn
  annotations:
    storageclass.kubernetes.io/is-default-class: "true"
provisioner: driver.longhorn.io
allowVolumeExpansion: true
reclaimPolicy: "Delete"
volumeBindingMode: Immediate
parameters:
  numberOfReplicas: "3"
  staleReplicaTimeout: "30"
  fromBackup: ""
  fsType: "ext4"
  dataLocality: "disabled"
,storageclass.kubernetes.io/is-default-class=true
Provisioner:           driver.longhorn.io
Parameters:            dataLocality=disabled,fromBackup=,fsType=ext4,numberOfReplicas=3,staleReplicaTimeout=30
AllowVolumeExpansion:  True
MountOptions:          <none>
ReclaimPolicy:         Delete
VolumeBindingMode:     Immediate
Events:                <none>
You can find an example of a storage class in the Longhorn examples which you can use as a template to setup further StorageClasss if needed.
Creating a volume
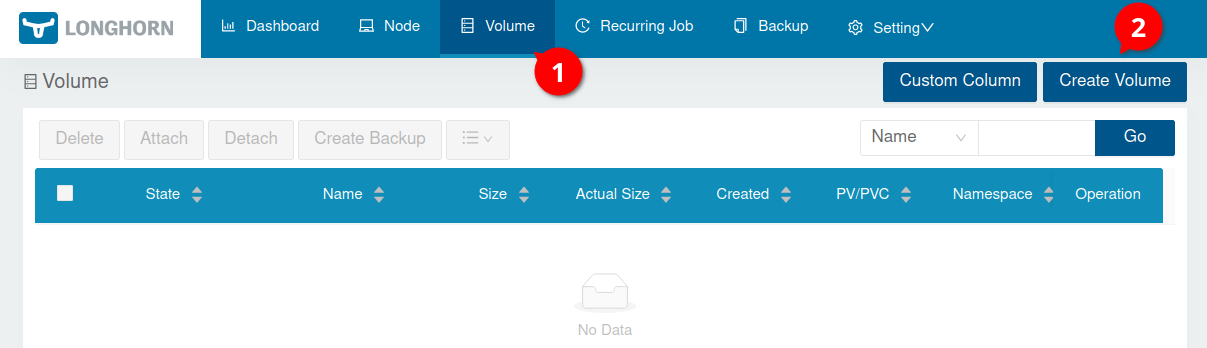
Finally lets create a volume. Click on Volume and then on Create Volume:
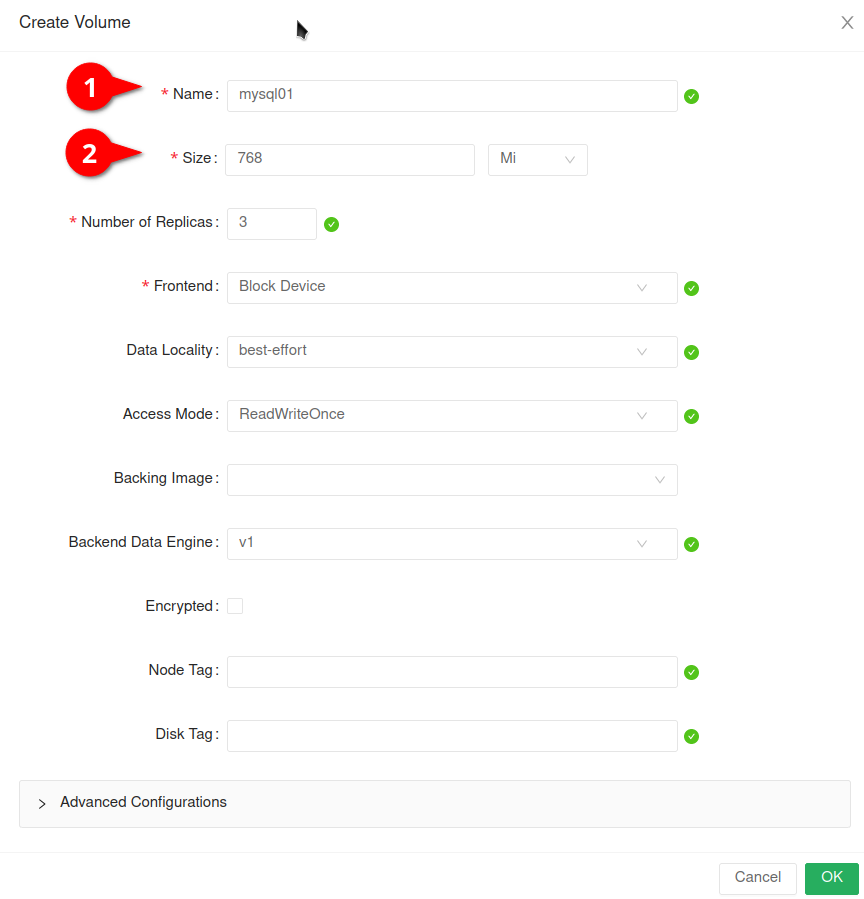
In the form you basically only need to put in a volume name (in my case mysql01) and the size of that volume. A replica count of 3 should already be good enough for running such volume in production.
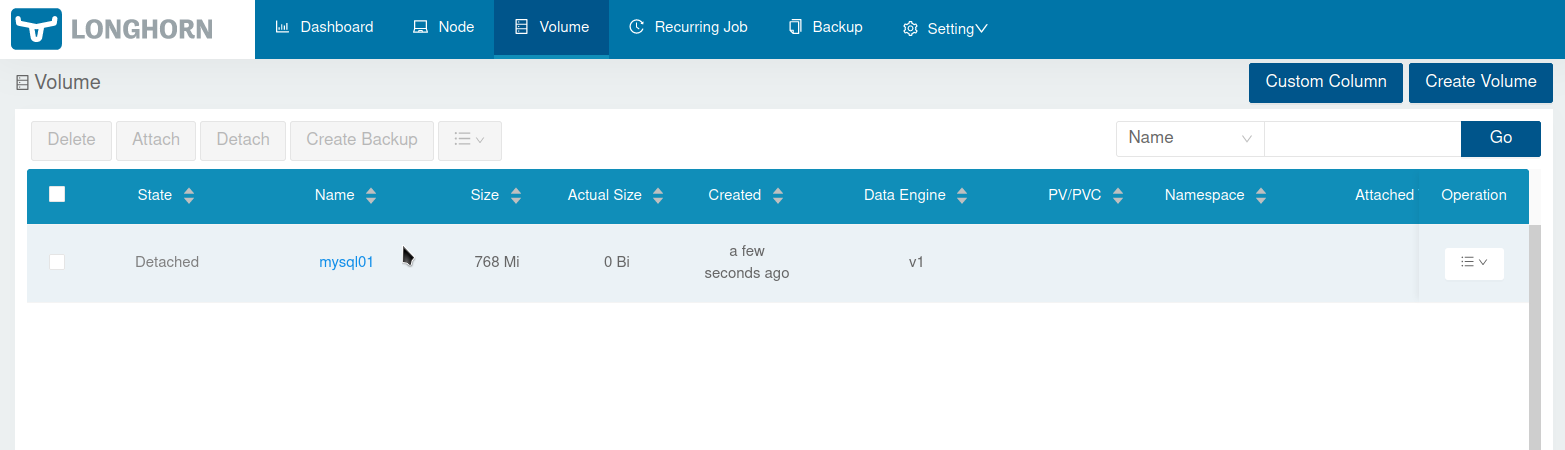
After clicking Ok you see the volume in the volume list:
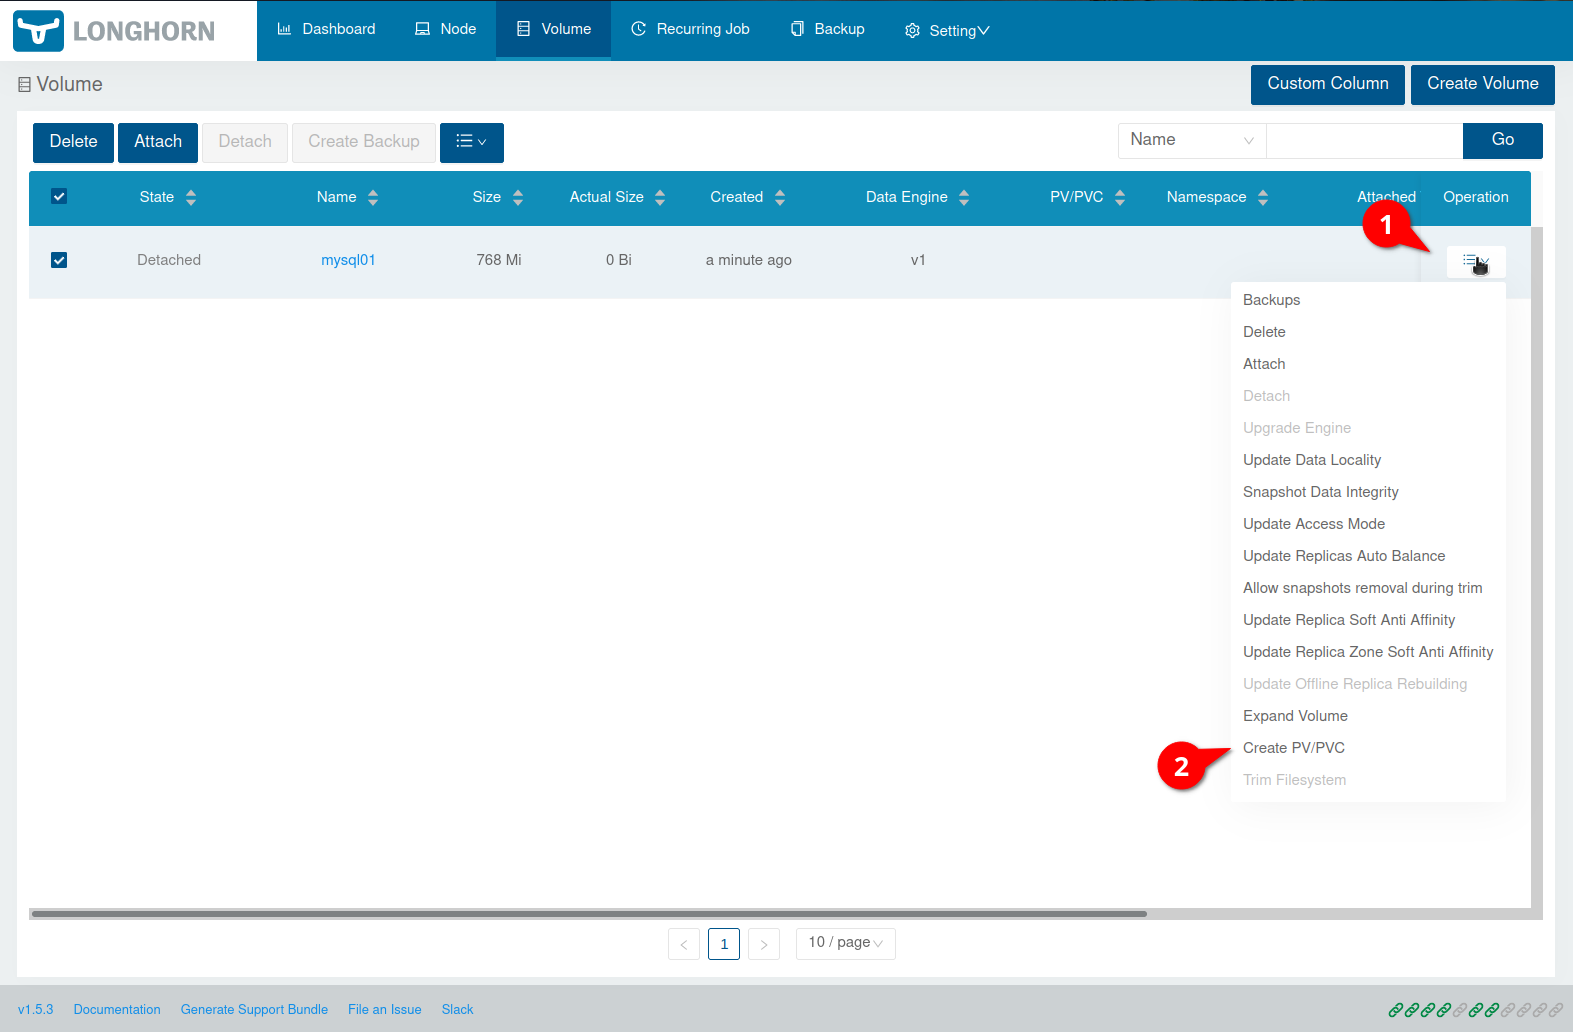
To make the volume usable for a Deployment e.g. we need to create a PVC (PersistentVolumeClaim) and a PV (PersistentVolume). So lets click on the “Burger menu” button on the right side of the volume and then Create PV/PVC:
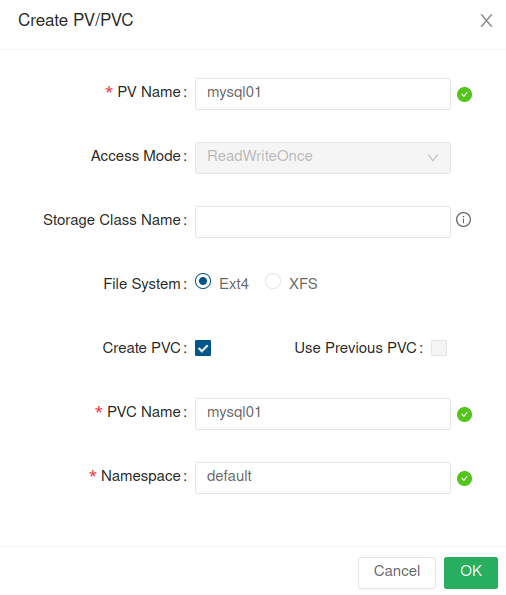
Now enter a PV Name and a Namespace:
We can now query the PVC/PV via kubectl:
kubectl --namespace default get pvc

NAME      STATUS   VOLUME    CAPACITY   ACCESS MODES   STORAGECLASS      AGE
mysql01 Bound mysql01 768Mi RWO longhorn-static 7skubectl --namespace default get pv
NAME CAPACITY ACCESS MODES RECLAIM POLICY STATUS CLAIM STORAGECLASS REASON AGE
mysql01 768Mi RWO Retain Bound default/mysql01 longhorn-static 41sTo finally make use of the volume lets create a MySQL 8 deployment. E.g. create a file called mysql8.yml with the following content:
apiVersion: apps/v1
kind: Deployment
metadata:
  name: mysql
  namespace: default
  labels:
    app: mysql
spec:
  selector:
    matchLabels:
      app: mysql # has to match .spec.template.metadata.labels
  strategy:
    type: Recreate
  template:
    metadata:
      labels:
        app: mysql
    spec:
      restartPolicy: Always
      containers:
      - image: mysql:8.0
        name: mysql
        env:
        - name: MYSQL_ROOT_PASSWORD
          value: changeme
        ports:
        - containerPort: 3306
          name: mysql
        volumeMounts:
        - name: mysql-volume
          mountPath: /var/lib/mysql
      volumes:
      - name: mysql-volume
        persistentVolumeClaim:
          claimName: mysql01
Apply the Deployment. E.g.:
kubectl --namespace default apply -f mysql8.yml

deployment.apps/mysql created
After a few seconds the container should be available:
kubectl --namespace default get pods -o wide

NAME                    READY   STATUS    RESTARTS   AGE   IP           NODE         NOMINATED NODE   READINESS GATES
mysql-7c9b44f5d-nnnjq   1/1     Running   0          22s   10.0.0.235   k8s-010103   <none>           <none>
Using kubectl --namespace default describe pod mysql-7c9b44f5d-nnnjq one will see (besides other information) something like this:
Events:
  Type    Reason                  Age   From                     Message
  ----    ------                  ----  ----                     -------
  Normal  Scheduled               90s   default-scheduler        Successfully assigned default/mysql-7c9b44f5d-nnnjq to k8s-010103
  Normal  SuccessfulAttachVolume  79s   attachdetach-controller  AttachVolume.Attach succeeded for volume "mysql01"
  Normal  Pulled                  78s   kubelet                  Container image "mysql:8.0" already present on machine
  Normal  Created                 78s   kubelet                  Created container mysql
  Normal  Started                 78s   kubelet                  Started container mysql
Lets check if the volume was mounted into the pod:
kubectl --namespace default exec mysql-7c9b44f5d-nnnjq -- bash -c "df -h"
Filesystem Size Used Avail Use% Mounted on
overlay 97G 13G 85G 13% /
tmpfs 64M 0 64M 0% /dev
/dev/vda1 97G 13G 85G 13% /etc/hosts
shm 64M 0 64M 0% /dev/shm
/dev/longhorn/mysql01 739M 201M 523M 28% /var/lib/mysql
tmpfs 16G 12K 16G 1% /run/secrets/kubernetes.io/serviceaccount
tmpfs 7.8G 0 7.8G 0% /proc/acpi
tmpfs 7.8G 0 7.8G 0% /proc/scsi
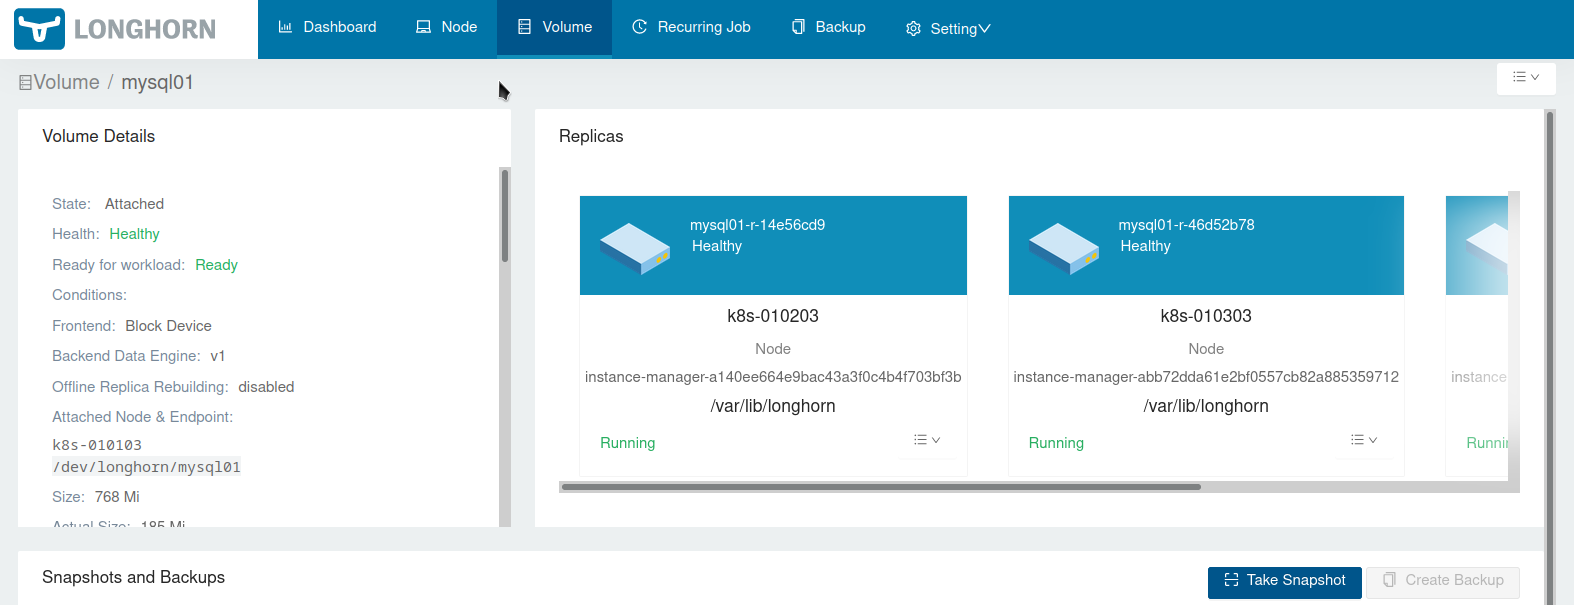
tmpfs 7.8G 0 7.8G 0% /sys/firmwareIf you now open http://localhost:8000/#/volume/mysql01 you should see that the volume is healthy:
To get rid of the test deployment run
kubectl --namespace default delete deployments mysqlThen the PV/PVC and volume can be deleted via the UI:

That’s basically it - and as always way too long blog post 😉 …
Useful links
- Default disks and node configuration
- Setting up Node Selector for Longhorn
- Customizing Default Settings
- Tip: Set Longhorn To Only Use Storage On A Specific Set Of Nodes
- Settings Reference
- Configuring Defaults for Nodes and Disks
- Longhorn K8s Manifest Examples
- Best Practices
- System Managed Components Node Selector
- Data Locality
- Longhorn Helm Chart values.yaml
- Troubleshooting: Longhorn default settings do not persist
- Longhorn in a Sandbox