Clone failing hard disk or partition with ddrescue
Important note
Before you try to recover data on a failing hard disk please strongly consider this advice: If your “life depends” on getting back data on a failing hard disk you should REALLY(!) contact a company which has specialized on recovering data from hard disks or other media like USB sticks and so on! Don’t try to do the recovery on your own in such a case. With every access to the disk chances rise that more data might become inaccessible. So please keep this in mind!
So you have a backup of all your data, right? 😉 But maybe you never tested it and now the disk is starting to fail and the backup is not usable. I guess that’s a common case. I had a similar situation but I actually had a working backup - at least a partial one 😉 But that was intentional because my backup disk wasn’t that big to fit all the data I had to backup. So it was ok for me to loose some not so important data which I excluded from the backup.
So sooner or later it of course happened and some data wasn’t readable anymore on a Western Digital 4TB HDD magnetic disk. And of course I also didn’t recognized that the S.M.A.R.T (or SMART in short) values got worse over time. Monitoring the SMART values would have most probably shown that the disk is about starting to die. But I wanted to keep all my data and since it was at least still possible to access the disk I tried to recover the data that was not in my backup.
SMART
After recognizing that something is wrong with the disk I installed GSmartControl utility to have a look what the SMART values are all about and it looked like this:
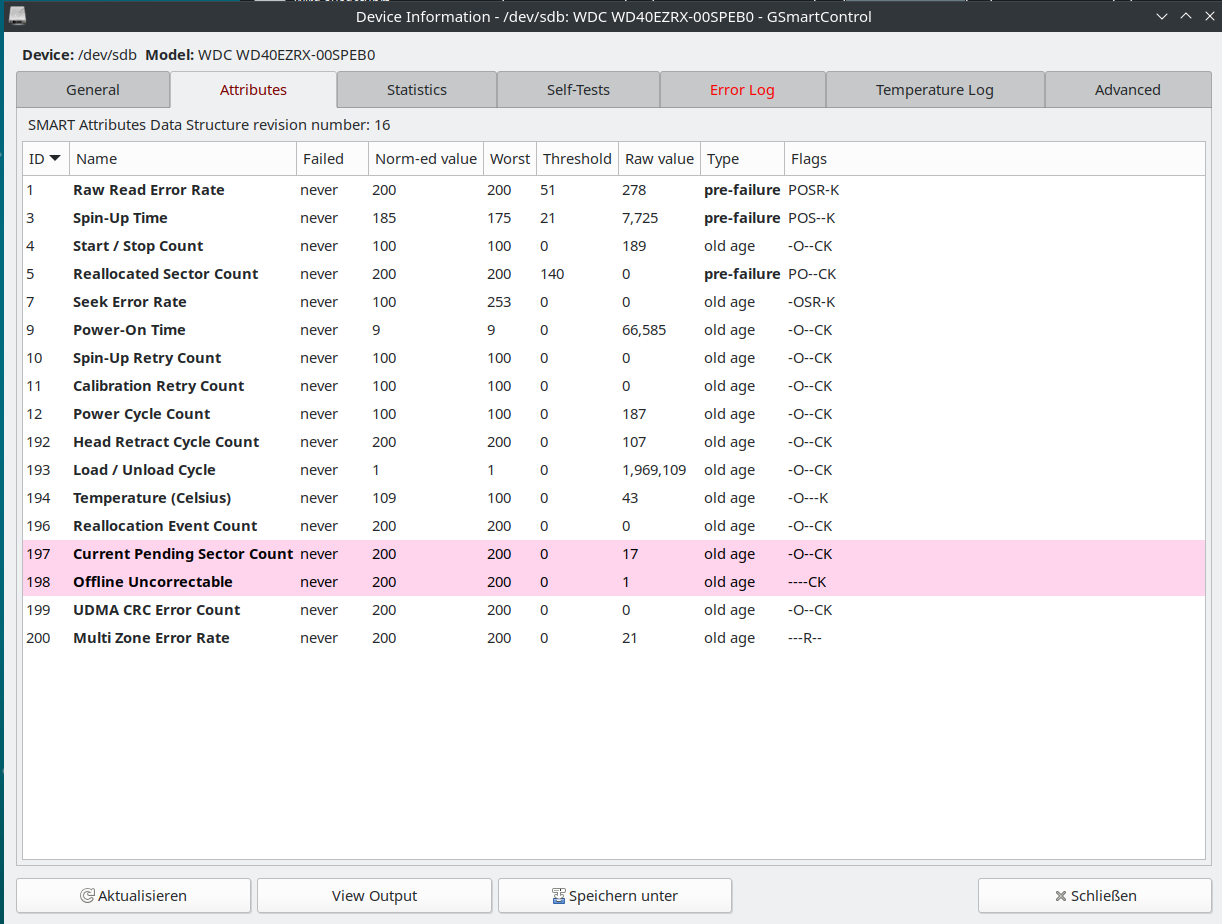
As you can see in the picture the values for Raw Read Error Rate, Current Pending Sector Count and Offline Uncorrectable are already beyond zero.
ddrescue
Searching the Internetz a little bit I finally decided to use ddrescue. GNU ddrescue is a data recovery (and cloning) tool. It copies data from one file or block device (hard disc, CDROM, etc) to another, trying to rescue the good parts first in case of read errors. It looked like the right tool for the job (and it turned out it was right tool 😉 ).
In my case /dev/sdb1 was the partition on a Western Digital 4TB HDD I wanted to rescue. Luckily I had enough space on another disk to store the recovered data there in a file. This file can be later mounted to copy files out of that image file. If you’ve another disk with at least the same size or bigger you can use that one too of course. That’s basically cloning the failing partition/disk to another disk.
To rescue the partition I used the following command (first run):
Cloning - first run
sudo ddrescue --verbose --idirect --no-scrape /dev/sdb1 sdb1.img sdb1.logfileLets discuss what these options are all about (for all possible options see ddrescue manual):
--verbosejust produces a little bit more output.--idirectuse direct disc access (opens the file with the flagO_DIRECT) for input file and bypassing the kernel cache.--no-scrapeskip the scraping phase. Avoids spending a lot of time trying to rescue the most difficult parts of the data. In order to preserve the disk I skipped this phase at least for the first run. As every additional hard disk seek could cause even more damage to the disk I first tried to get every piece of data that is still readable. Trying to read the potentially damaged data will be done in a second run (see further down below)./dev/sdb1is the partition I wanted to rescue. If you want to clone a whole disk just use/dev/sdX(whileXneeds to be replaced with the correct character of the disk you want to rescue e.g.aas/dev/sdais normally the first disk e.g.)sdb1.imgis the name of the image file where all the (recoverable) data from/dev/sdb1will be copied. Make sure that you choose a path on a disk that has enough space to store your cloned data. In my case the data was stored in the directory I was currently using.sdb1.logfilespecifies the so calledmapfile. Without a mapfile,ddrescuecan’t resume a rescue, only re-initiate it. Be careful to not specify by mistake an old mapfile from an unrelated rescue. In older versions ofddrescuethis was calledlogfilebut the format is still the same. This file is needed for the second run ofddrescue(the further down below).
After running the command above I got the following output (the whole run took over 14hrs to finish - so be patient 😉 )
GNU ddrescue 1.26
About to copy 4000 GBytes from '/dev/sdb1' to 'sdb1.img'
    Starting positions: infile = 0 B,  outfile = 0 B
    Copy block size: 128 sectors       Initial skip size: 78208 sectors
Sector size: 512 Bytes

Press Ctrl-C to interrupt
     ipos:    4000 GB, non-trimmed:    65536 B,  current rate:  69795 kB/s
     opos:    4000 GB, non-scraped:        0 B,  average rate:  77129 kB/s
non-tried:   40042 kB,  bad-sector:        0 B,    error rate:       0 B/s
  rescued:    4000 GB,   bad areas:        0,        run time: 14h 24m 30s
pct rescued:   99.99%, read errors:        1,  remaining time:          1s
                              time since last successful read:          0s
Copying non-tried blocks... Pass 1 (forwards)
     ipos:  118035 MB, non-trimmed:   131072 B,  current rate:       0 B/s
     opos:  118035 MB, non-scraped:        0 B,  average rate:  77119 kB/s
non-tried:    65536 B,  bad-sector:        0 B,    error rate:   16384 B/s
  rescued:    4000 GB,   bad areas:        0,        run time: 14h 24m 38s
pct rescued:   99.99%, read errors:        2,  remaining time:          1s
                              time since last successful read:          4s
Copying non-tried blocks... Pass 2 (backwards)
     ipos:  118035 MB, non-trimmed:   196608 B,  current rate:       0 B/s
     opos:  118035 MB, non-scraped:        0 B,  average rate:  77105 kB/s
non-tried:        0 B,  bad-sector:        0 B,    error rate:    7281 B/s
  rescued:    4000 GB,   bad areas:        0,        run time: 14h 24m 47s
pct rescued:   99.99%, read errors:        3,  remaining time:         n/a
                              time since last successful read:         13s
Copying non-tried blocks... Pass 5 (forwards)
     ipos:  118035 MB, non-trimmed:        0 B,  current rate:       0 B/s
     opos:  118035 MB, non-scraped:   182272 B,  average rate:  77081 kB/s
non-tried:        0 B,  bad-sector:     1024 B,    error rate:       0 B/s
  rescued:    4000 GB,   bad areas:        2,        run time: 14h 25m  2s
pct rescued:   99.99%, read errors:        5,  remaining time:      1m 41s
                              time since last successful read:          4s
Trimming failed blocks... (forwards)
Finished
If you’ve studied the output closely you might have recognized that there was no Pass 4. As you might remember I added the --no-scrape option to ddrescue which skips the scraping phase and Pass 4 would have been the scraping phase. ddrescue divides its activities in five phases (or six if you include creating the mapfile too). As long as you create a mapfile you can interrupt the cloning and restart it where ddrescue left off.
You can also see in the output above that about 99.99% of the data was rescued. That’s pretty nice of course 💪 With that disk I was pretty lucky. There were only a few read errors.
Cloning - second run
As already mentioned above now it’s time for the second run of ddrescue to try to recover also at least parts of the bad data that was skipped in the first run. The command I used for the second run:
sudo ddrescue --verbose --idirect -r3 --no-scrape /dev/sdb1 sdb1.img sdb1.logfileThe options are the same as I used in the first run besides one:
-r3exit after three retry passes. Every bad sector is tried only once in each pass. The direction (forwards/backwards) is reversed after each pass. To retry bad sectors detected on a previous run, you must specify a non-zero number of retry passes. It might make sense to even increase this value to a higher value.
Running the command above produced the following output (this run is now way faster then the first run as it retries way less sectors now):
GNU ddrescue 1.26
About to copy 4000 GBytes from '/dev/sdb1' to 'sdb1.img'
    Starting positions: infile = 0 B,  outfile = 0 B
    Copy block size: 128 sectors       Initial skip size: 78208 sectors
Sector size: 512 Bytes

Press Ctrl-C to interrupt
Initial status (read from mapfile)
rescued: 4000 GB, tried: 183296 B, bad-sector: 1024 B, bad areas: 2

Current status
     ipos:  118035 MB, non-trimmed:        0 B,  current rate:       0 B/s
     opos:  118035 MB, non-scraped:   182272 B,  average rate:       0 B/s
non-tried:        0 B,  bad-sector:     1024 B,    error rate:     128 B/s
  rescued:    4000 GB,   bad areas:        2,        run time:          9s
pct rescued:   99.99%, read errors:        2,  remaining time:         n/a
                              time since last successful read:         n/a
Retrying bad sectors... Retry 1 (forwards)
     ipos:  118035 MB, non-trimmed:        0 B,  current rate:       0 B/s
     opos:  118035 MB, non-scraped:   182272 B,  average rate:       0 B/s
non-tried:        0 B,  bad-sector:     1024 B,    error rate:     128 B/s
  rescued:    4000 GB,   bad areas:        2,        run time:         17s
pct rescued:   99.99%, read errors:        4,  remaining time:         n/a
                              time since last successful read:         n/a
Retrying bad sectors... Retry 2 (backwards)
     ipos:  118035 MB, non-trimmed:        0 B,  current rate:       0 B/s
     opos:  118035 MB, non-scraped:   182272 B,  average rate:      21 B/s
non-tried:        0 B,  bad-sector:      512 B,    error rate:       0 B/s
  rescued:    4000 GB,   bad areas:        1,        run time:         23s
pct rescued:   99.99%, read errors:        5,  remaining time:         35m
                              time since last successful read:          4s
Retrying bad sectors... Retry 3 (forwards)
Finished
After that step it was good enough for me. I got basically every file back. If you want you can now also include Pass 4 (the scrapping step) by removing the --no-scrape option and do a third run e.g.:
sudo ddrescue --verbose --idirect -r3 /dev/sdb1 sdb1.img sdb1.logfileRestoring recovered data
While I was trying to rescue my data on that failing disk I already ordered a new one. After that one arrived I created a new partition on that new disk. The final step now was to copy the recovered files out of that image file (sdb1.img) created above. For this I mounted the image file into a directory using the loop device e.g.:
sudo mount -o loop sdb1.img /mntThen I used rsync command to copy all the files to the new disk (after setting up this new disk like creating a partition and formatting it with a file system). Lets assume that the new disk is mounted at /data the command to copy the files looks like this (besides other things --archive keeps all the permissions e.g.):
sudo rsync --archive --verbose --progress /mnt/ /data/So finally I recovered basically all my files. Kudos to ddrescue! ❤️ Your result of course will vary. Maybe you can recover everything, maybe you’ll only get parts of your data back.